
Introduction
Secure Onboard Communication (SecOC) is a new standard by AUTOSAR to add a Message Authentication Code (MAC) to messages on a vehicle’s CAN bus. This prevents devices that have no knowledge of the secret AES key to communicate with the rest of the vehicle. However, this also prevents the owner of the vehicle to install any third-party devices not sanctioned by the vehicle manufacturer.
In this blog post we will explain how we broke the SecOC implementation of a 2021 RAV4 Prime by attacking the power steering ECU. The ultimate goal was to run openpilot on this car, but it can also be used to run other aftermarket devices. All code referenced in this post can be found in this repository: I-CAN-hack/secoc.
We will start with an introduction to SecOC. Then we'll describe how the firmware was extracted and reverse engineered. Finally we'll explain how the bootloader implements firmware updates, and how we can use this to get code execution.
I want to give credit to my former colleague Greg Hogan. We started this research together and he helped out a lot with reverse engineering.
 SecOC CAN Messages
What is SecOC?
The goal of SecOC is to add authenticity checking to the messages on the CAN bus of a vehicle. Adding good authenticity checking will always involve some trade-offs. The first trade-off is between cryptographic soundness and computation time, as the computation of the authenticator should not influence the real-time computations done by an ECU. Secondly, there is a balance between between brute-force resistance and usable payload, as only part of the authenticator can be included in the message to leave room for the payload. The usable payload of a standard CAN message is only 8 bytes, so not much space is available.
Authenticity checking for CAN messages is not a new concept, but was usually based on proprietary checksum algorithms. However, once the algorithm had been reverse engineered valid checksums can be generated. See for example the research done by Charlie Miller and Chris Valasek 1. As an improvement over these proprietary algorithms, AUTOSAR defined the SecOC standard2, which proposes an authentication scheme based on AES CMAC. AES is fast to compute and supported in hardware by many processors. The standard suggest different profiles based on robustness against brute-force attacks, but in the end it's up to the implementor to choose how much room for payload they want to sacrifice.
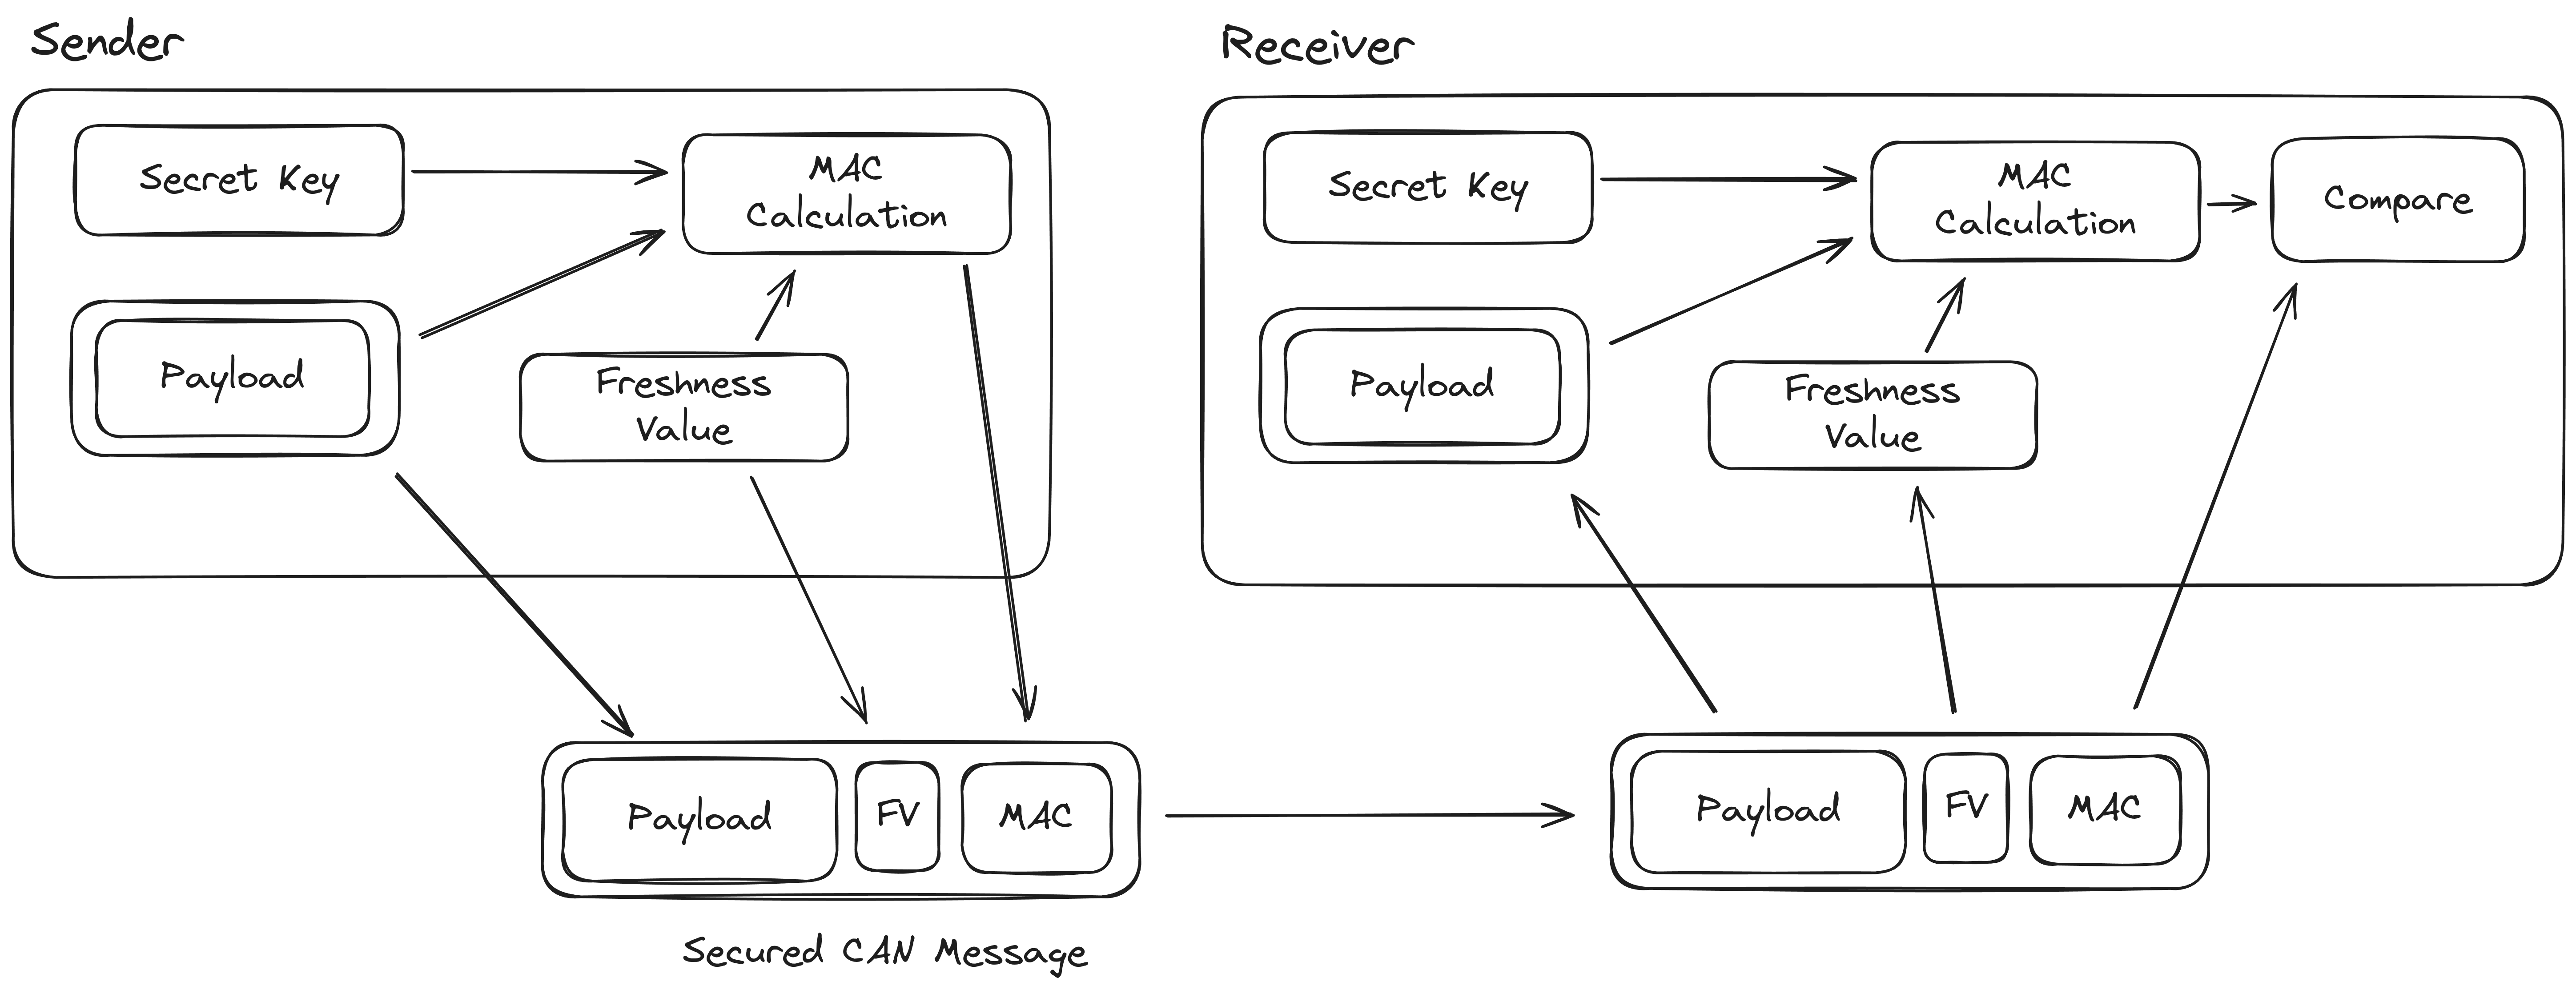
The diagram below shows an overview of the whole SecOC implementation on the sender and receiver side. In the following paragraphs we will go into more detail about all the different parts.
 Overview of SecOC
Freshness Value
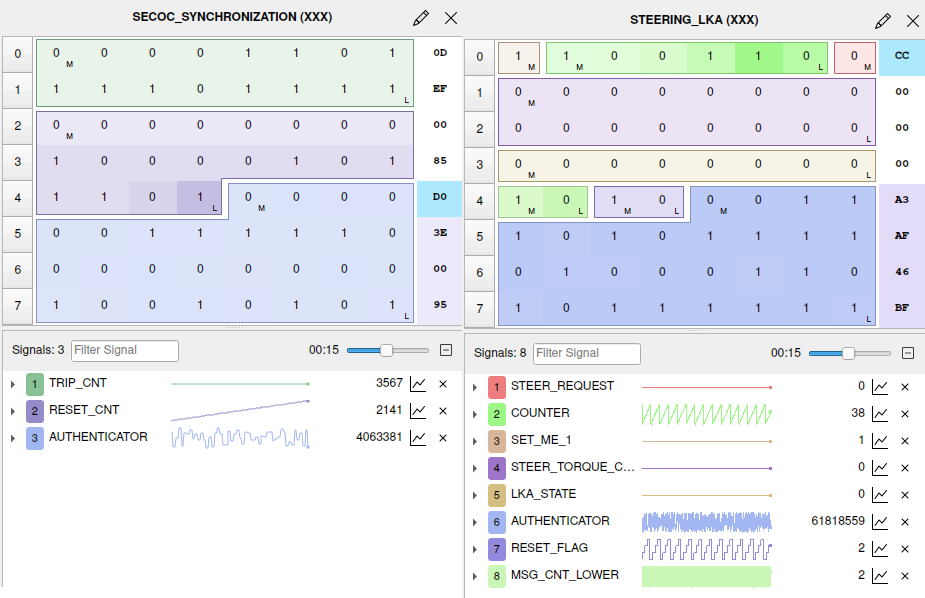
A counter is added to messages to avoid replay attacks, where an attacker collects a lot of data, and forges a message by cutting and pasting. To prevent this, it's important that a monotonically increasing counter is included in the MAC computation. Even across multiple drives this counter should not repeat itself. This counter is called the Freshness Value (FV) and is constructed by combining the following counters, see the figure below.
 Contents of the Freshness Value
- Trip Counter - incremented each time the vehicle is started. This counter is managed by the SecOC coordinator (e.g. the gateway), and is broadcasted to the rest of the network as part of the synchronization message.
- Reset Counter - incremented at a fixed interval. This counter is also part of the synchronization message.
- Message Counter - incremented each time a message is sent by a specific ECU. It's reset to zero when the Reset Counter is incremented.
- Reset Flag - The Reset Flag is composed of the least few significant few bits of the reset counter. These are added to the Freshness Value again, this ensures that if the Freshness Value is truncated it contains both the least significant bits of the Reset Counter and the Message Counter.
Synchronization Message
To ensure that all ECUs on the network use the same Trip Counter and Reset Counter, a synchronization message is sent periodically by the SecOC coordinator (e.g. the gateway). This message contains the full Trip Counter and Reset Counter and is also protected by a MAC.
MAC Computation
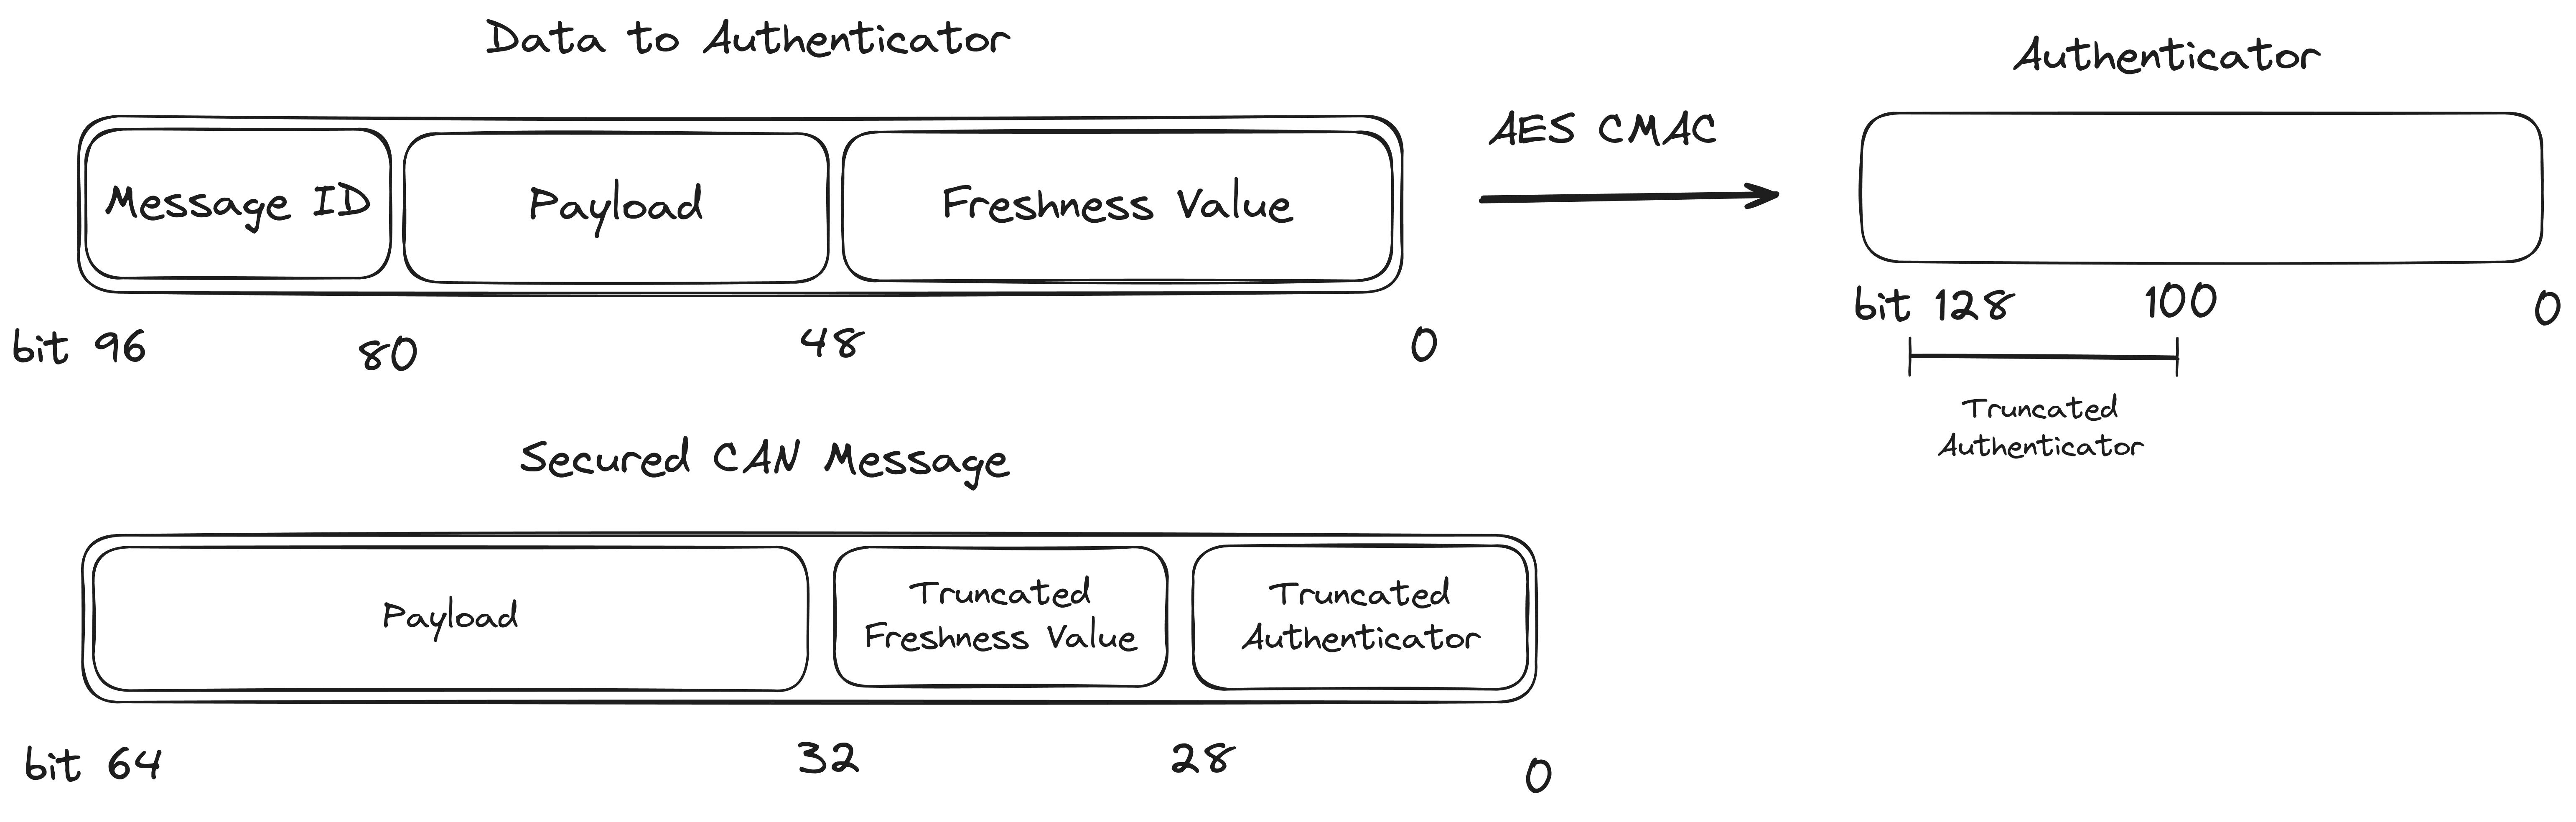
The first step of computing the MAC is to build the data that is used for authentication. This data is constructed by concatenating the CAN Arbitration ID (e.g. the address), the payload and Freshness Value. The MAC itself is then computed using a 128 bit AES CMAC algorithm. Refer to NIST SP 800-38B or RFC4493 for details on the algorithm. The pycryptodome package has a Python implementation that can also be used to understand the algorithm, and was very useful as a reference when reverse engineering.
After computing the MAC, the message that will be sent out over the network has to be constructed. This is done by concatenating the payload, a few of the lower bits of the Freshness Value and the upper bits of the MAC. By adding the lower bits of the Freshness Value the receiving nodes receive both the lower bits of the Reset Counter and the Message Counter. By combining this with the internal state of the receiver this should be enough to construct the full Freshness Value of the transmitter. After the Freshness Value is reconstructed the MAC can be computed and compared to the truncated MAC that was sent with the message.
 Data to Authenticator
Key Update
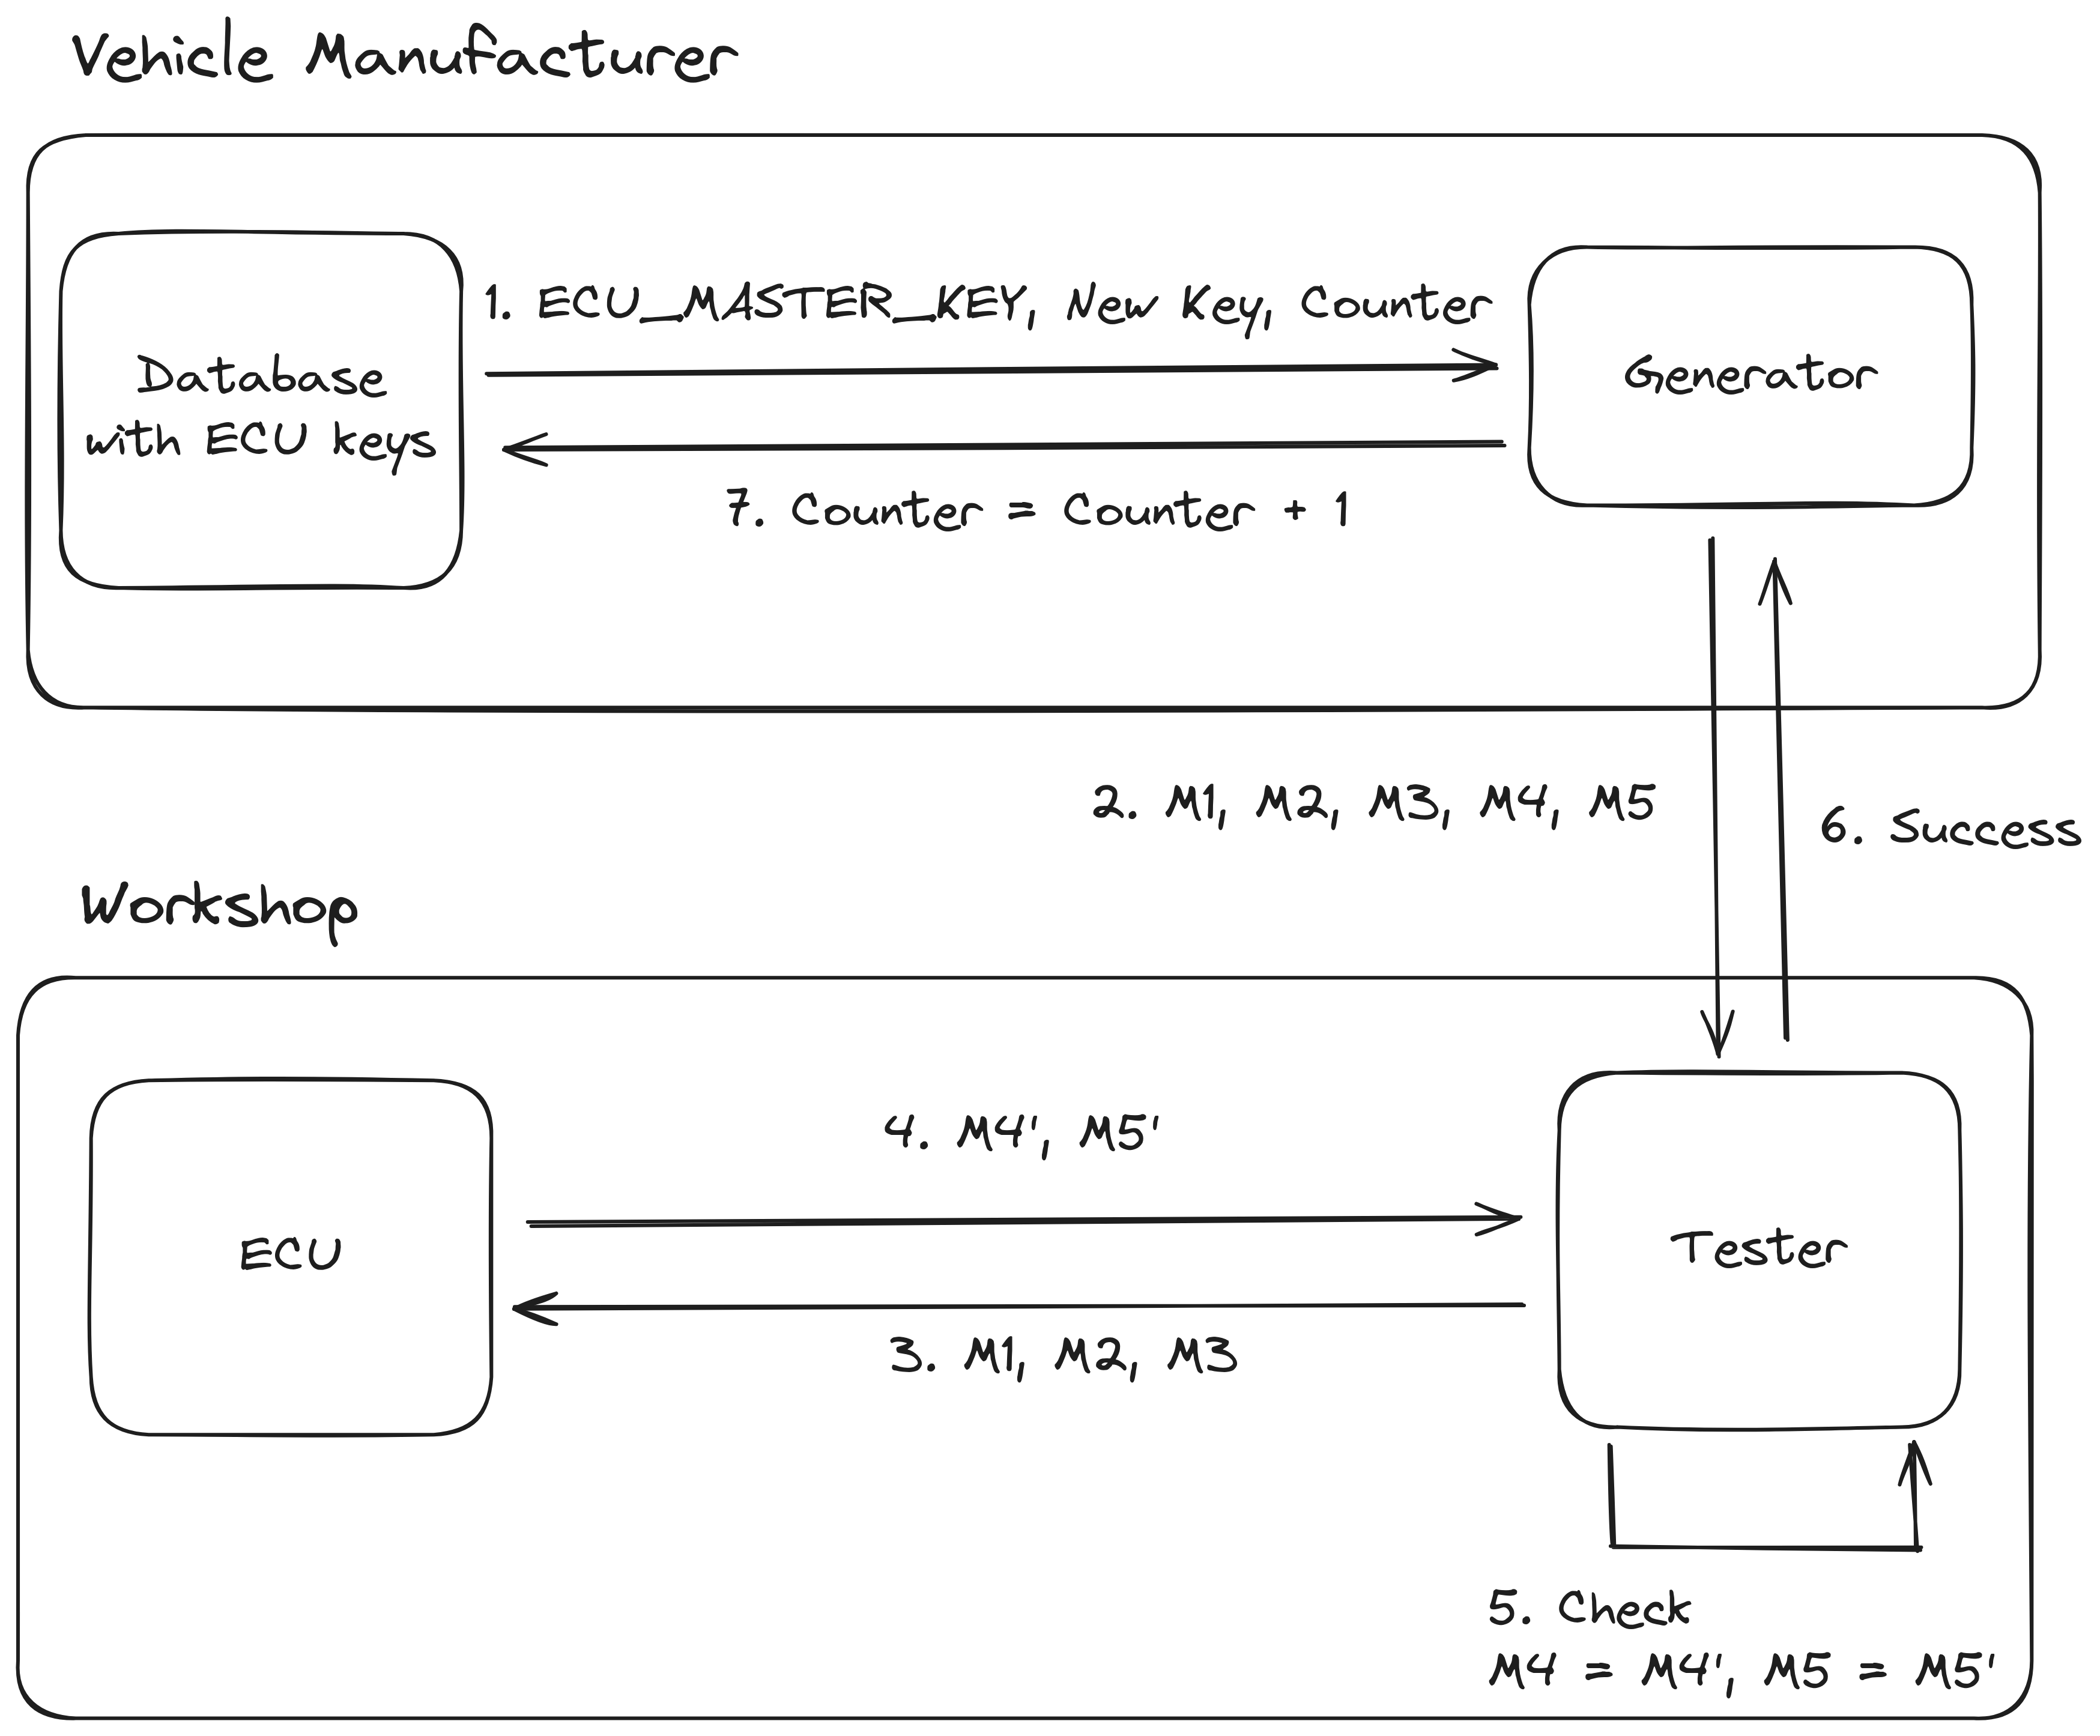
As the AES cryptography involved in computing the MAC is based on symmetric cryptography all ECUs need to have knowledge of the same key, while at the same time it's important that these keys can not be easily known by an attacker. When a new component is installed in the car by a workshop, the workshop needs to be able to update the keys on the new ECU so they match the rest of the car. Because an attacker could simulate the installation of a new ECU it's important that the key cannot be obtained by observing this rekeying operation.
This key management is part of a different AUTOSAR standard, namely the specification of Secure Hardware Extensions (SHE). An overview of this process can be seen in the figure below. The most important takeaway about this process is that the new key is encrypted using one of the keys already present in the ECU. This key can either be the current SecOC key, or the MASTER_ECU_KEY (that is not supposed to be changed during the life of the ECU). This way the new key can be decrypted by the new ECU without the attacker being able to obtain the key. For more information refer to the AUTOSAR SHE standard, or Vector KB0012486.
 SecOC Key Update
Target Hardware
This research started in the beginning of 2021 when the first Toyota vehicles with SecOC started to come out. At the time, the most common vehicle was the 2021 Rav4 Prime, but due to the chip shortage it was still hard to find. Later SecOC started rolling out to more Toyota vehicles, first only for vehicles produced in their Japanese plant but it has now made its way to the US produced Corollas.
Besides a target vehicle, we also needed to select a target ECU that used SecOC in the messages it received or transmits. This mean the power steering (EPS), forward camera and power train (PCM) ECUs were all possible targets.
We decided to start out with the power steering (EPS). The microcontroller inside needs to adhere to certain safety standards such as ASIL-D, hopefully this means it uses older technology with less security features. Also the firmware on the EPS is usually not too big, which should make reverse engineering less tedious.
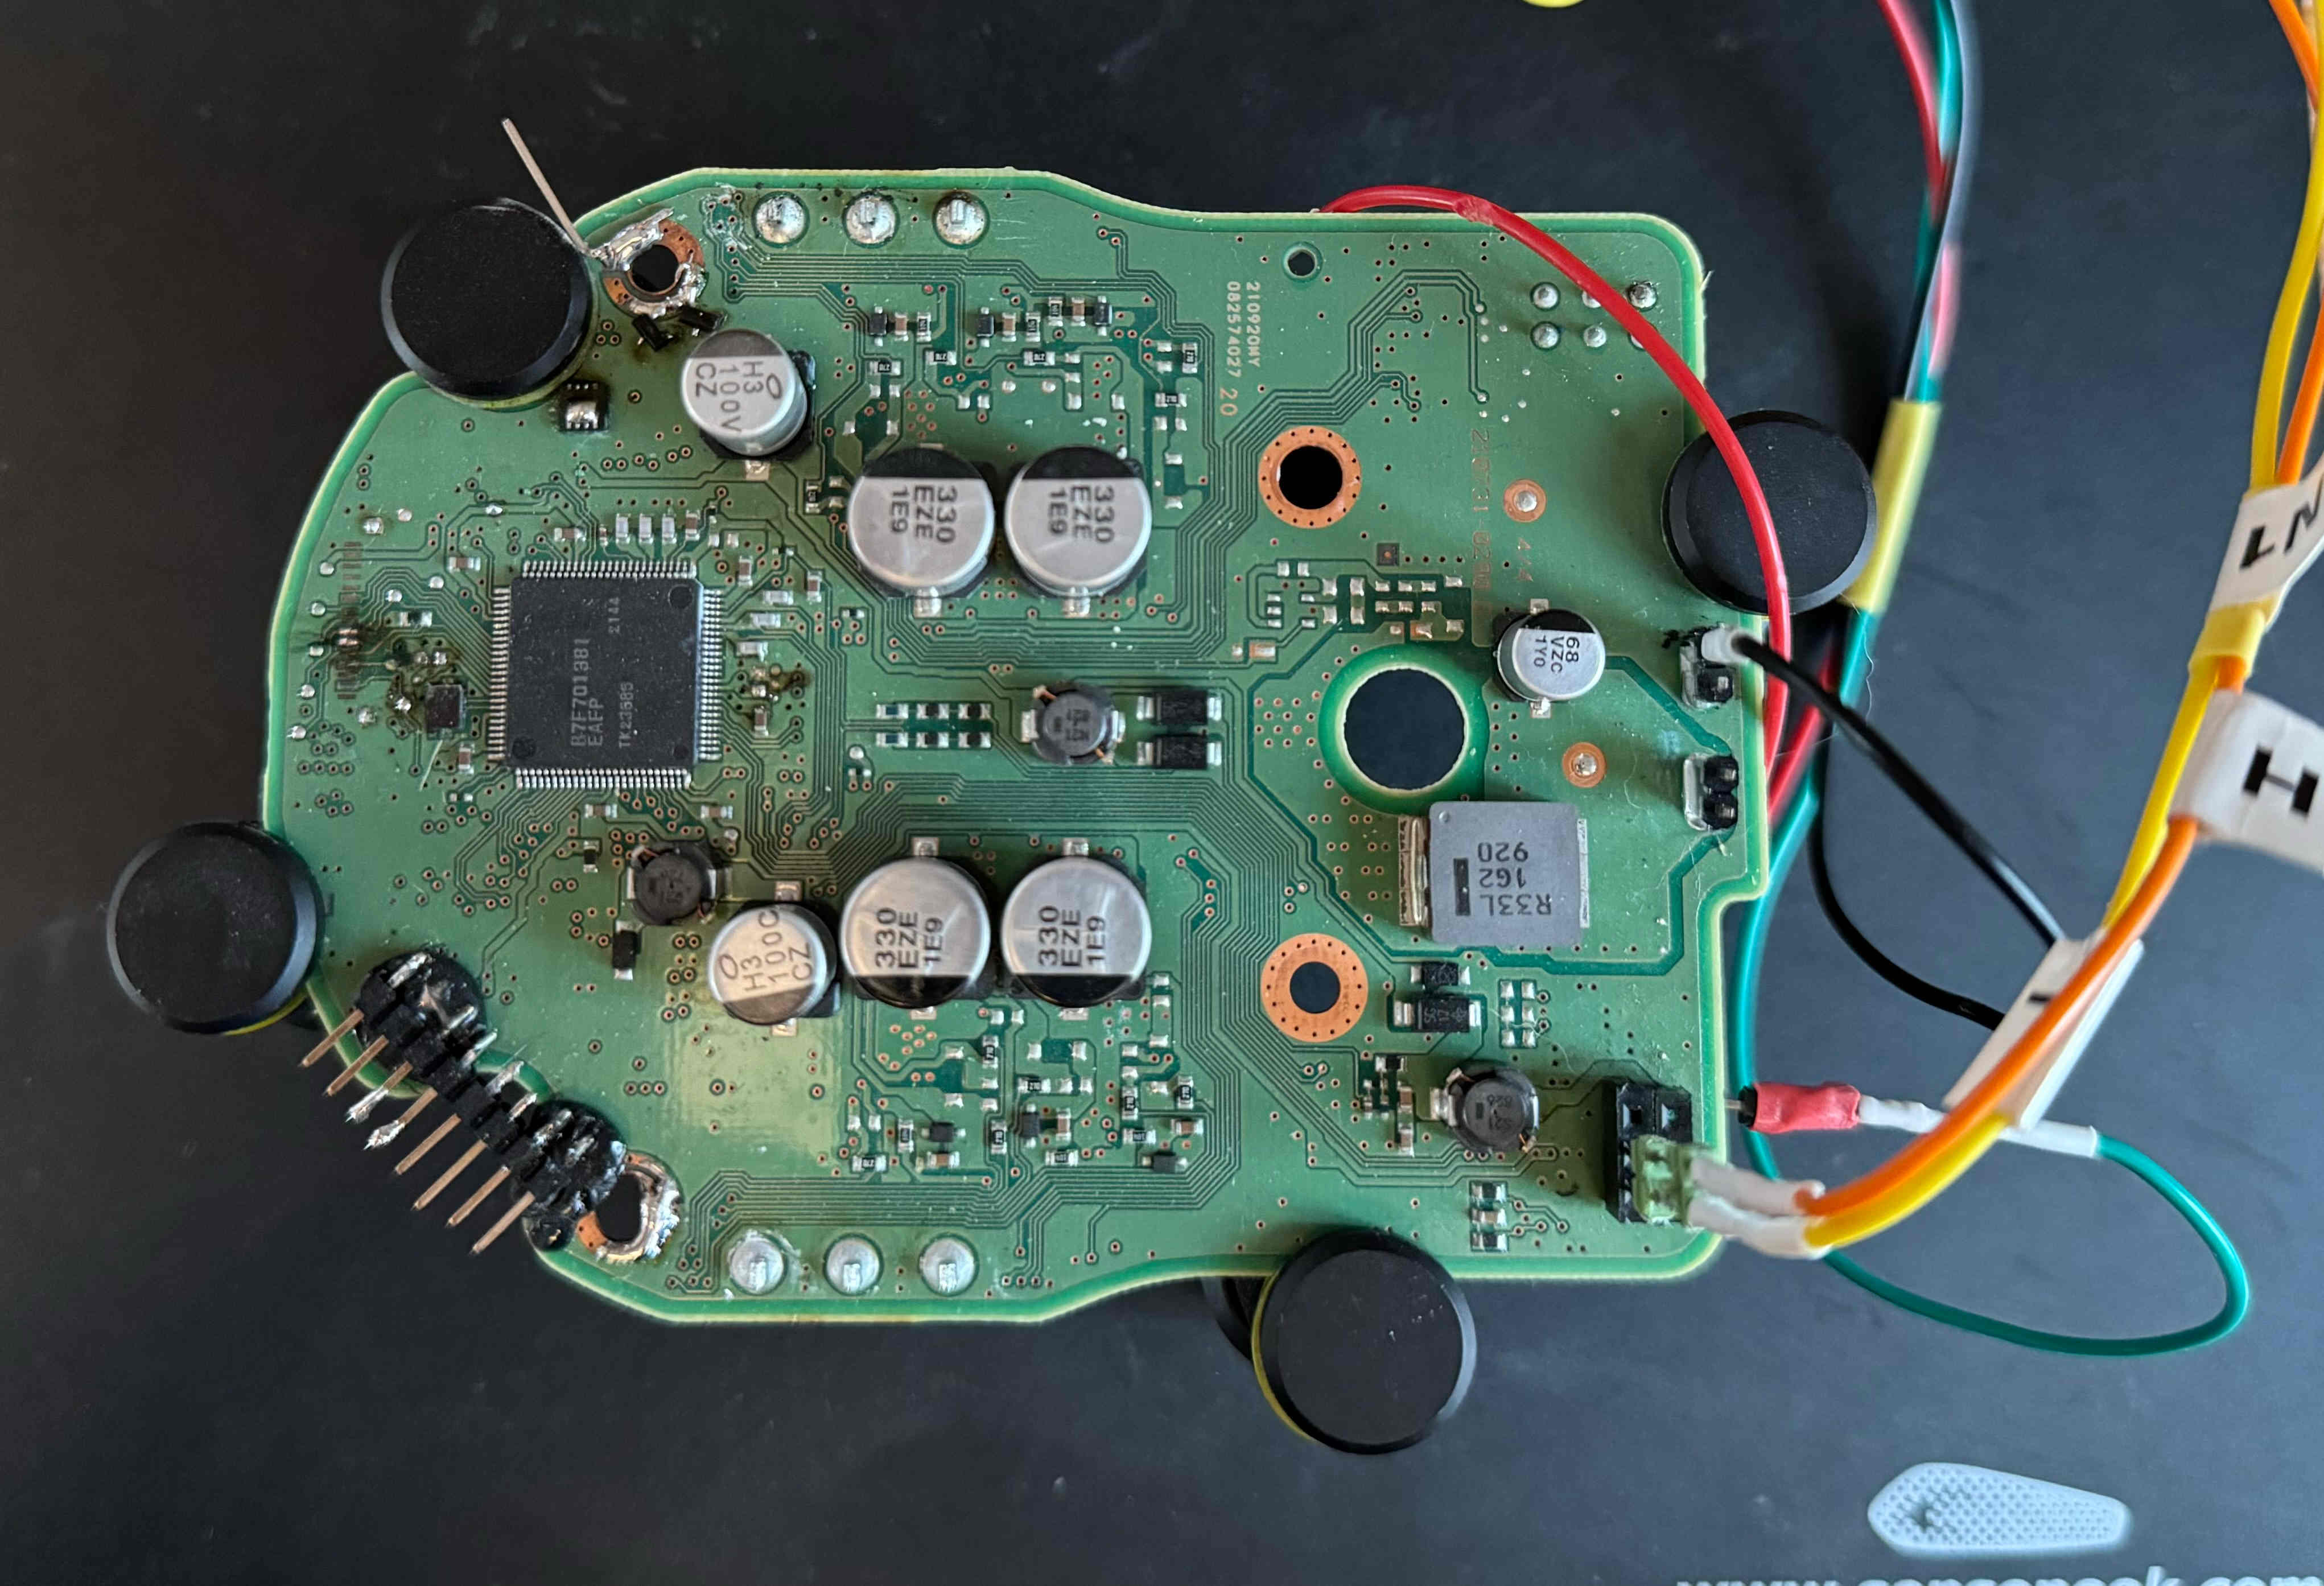 Picture of the PCB
Firmware Extraction
After choosing the target ECU we need to obtain the hardware. Unfortunately, the car itself was very rare, so no crashed vehicles showed up for parts. In the end, we bought the whole steering rack as a new spare part 3. The EPS contained a Renesas RH850/P1M-E, but the debug port was locked. Using a Voltage Fault Injection attack we were able to extract the firmware anyway. For more details about this see this previous blog post "Bypassing the Renesas RH850/P1M-E read protection using fault injection".
Firmware Layout
The extracted firmware has a typical layout for an automotive firmware. There is a bootloader, a stand-alone application that communicates over CAN and takes care of updating the application. There is also the main application, which runs the power steering logic and also exposes some diagnostic endpoints on CAN.
Application Reverse Engineering
The first step to understand how SecOC was implemented was to start reverse engineering the application firmware. When reverse engineering it's often useful to find and identify distinct parts of the problem you're trying to solve, and then try to meet in the middle. In this case we actually had three leads and we could try to connect the dots.
Our first lead was the the Unified Diagnostic Services (UDS)4 routine control 0x0110, which is involved in updating the SecOC keys. First we identified the UDS handlers by looking for constants used for UDS error codes. Looking for a function that has both 0x35 (Invalid Key) and 0x36 (Exceeded number of attempts) usually turns up the UDS handler for the security access routine. From there you can work your way up to find the routine control handler.
The second lead was that we knew that the incoming CAN messages would need to be validated. So we looked up the relevant CAN registers in the datasheet, and identified the parts of the code that were reading data from the CAN bus. From there we could follow the data flow until the MAC of the contents would be calculated.
The final piece of the puzzle came when we realized the specific SecOC implementation was not using an Hardware Security Module (HSM), and all AES computation was done in software. Using ghidra-findcrypt we could easily find the location of the AES SBoxes. From there we could identify more high level functions such as encrypting a block of data.
After spending many evenings reverse engineering, and labeling over a 1000 functions in the firmware we were finally able to piece everything together. We fully reverse engineered how the SecOC checks were implemented, and where all the relevant keys are located in RAM (remember, no HSM was used). Now we just needed to find an arbitrary read vulnerability to actually extract the keys, or find a way to disable SecOC validation. However, this was easier said than done.
To find a way to bypass SecOC we did a general audit of the code. We checked most code around the SecOC handling, UDS handlers and looked for other debug protocols such as CCP/XCP. However, even after spending a considerable amount of time we didn't find anything useful. We did have a few findings that are worth mentioning:
- The SecOC checking is disabled for the first second after boot. During this startup period messages with a wrong MAC are fully parsed and processed. We looked for ways to increase this time, but it seems hardcoded in the firmware.
- The UDS handler implements non-standard SIDs 0xAB and 0xBA. They process some 5 character commands such as
BAENA,JTEKM,JTRM1, etc. The exact purpose is unknown. - There are a set or CAN Arbitration IDs (0x13, 0x14, 0x15, 0x16, 0x17, 0x18, 0x19, 0x1a) that allow for temporarily setting a new SecOC key. However, it looks like knowledge of the
ECU_MASTER_KEYis needed just like with an actual key update. - There seems to be no anti-rollback protection on the Trip Counter
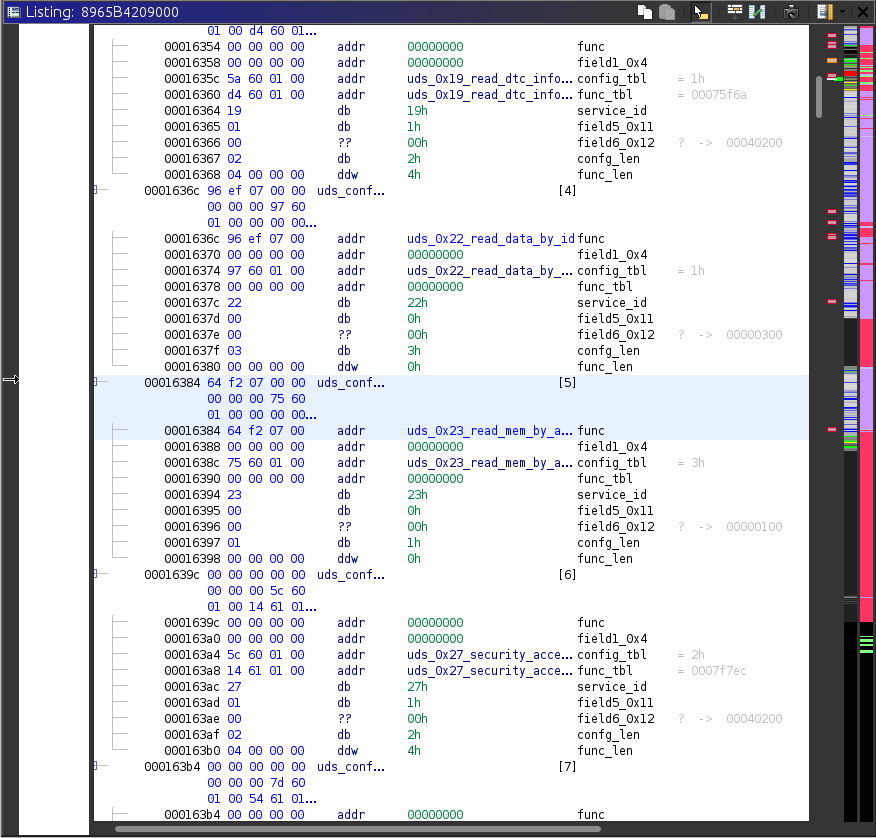 Ghidra Screenshot of the UDS function table
Bootloader Reverse Engineering and Update Protocol
After not finding any paths in the application itself to get the keys out we focussed our attention on the bootloader. The bootloader's main purpose is flashing updates to the ECU, and is a stand-alone application. If flashing an update fails for some reason the ECU stays in the bootloader so you can try to flash it again. This means we had to mostly start over with reverse engineering and finding all the UDS related code.
After reverse engineering most of the UDS handlers related to flashing we noticed the ECU allows flashing a region of flash for the application, as well as uploading data to section of RAM. There were some routines that called functions located in this portion of RAM, so this seemed very promising. However, it took quite a bit more reverse engineering to figure out what the exact purpose of this region in RAM was. Remember, there aren't actually any updates for this ECU, so we couldn't observe how the Toyota software would do a reflash.
At some point we realized that the bootloader code did not contain any functions to handle the low level operations to write a flash sector or erase it. Instead it would prepare the data to flash in a buffer, and then call a function in the mysterious RAM region with a pointer to this buffer. This meant that if we could somehow get some code in the mystery RAM region we had a method of getting it to execute.
Why this method of reflashing was chosen is not exactly clear to us. A possible reason could be to make the ECU more fool-proof by not including the needed code to erase the application, since without any update files available it would need to be replaced to fix it if the application was erased. Alternatively the developers wanted to keep some flexibility in case there was a bug in the bootloader that would otherwise be impossible to fix in the field.
Even though we knew we could trigger code from RAM by requesting to flash or erase a region of flash, we still needed a way to actually upload this code. This turned out to be quite cumbersome, since the ECU only accepts encrypted blobs with a correct CRC and CMAC. We also needed to pass a security access algorithm before we could access the flashing functionality in the first place. Luckily all cryptography was based around AES, so we had access to all the required key material from the extracted firmware.
Update Procedure
By reverse engineering the bootloader, and working through all the different state machines of the flashing logic we managed to reconstruct the following update procedure.
- Jump to bootloader, using UDS SID 0x10 (Diagnostic Session Control)
- Authenticate using UDS SID 0x27 (Security Access), request seed and send corresponding key to log in. See below for more details on the security access algorithm.
- Set some AES keys/IV using UDS SID 0x2E (Write Data By Identifier). Specifically DID 0x203 (5 bytes, purpose unknown), DID 0x201 (AES key used to derive encryption key) and DID 0x202 (AES IV).
- Upload 4kb of flashing routines to RAM address
0xFEBF0000using UDS SID 0x34 (Request Download), 0x36 (Transfer Data), 0x37 (Request Transfer Exit) In our case we would be uploading an exploit/shellcode instead of flashing routines. See below for more details on the construction of the payload - Run a routine control to verify the CRC and CMAC of the uploaded data. UDS SID 0x31 (Routine Control), specifically routine identifier 0x10f0. We pass the address and size of the uploaded data to the routine control.
- Request to erase a random area, using routine control 0xff00. We pass the address and size of the area to erase. This will trigger our shellcode.
Security Access Algorithm
Before uploading any data is allowed, we need to authenticate with the ECU. In UDS this is done using SID 0x27 Security Access. The normal procedure is that a (random) seed is requested, we run some kind of cryptographic operation on this seed to produce a key. This key is then sent to the ECU, and if it's correct we're logged in.
However, on this ECU the procedure is slightly different. When requesting the seed, the ECU also expects 16 bytes of data that is also involved in the computation of the key. The ECU contains a 16 byte secret, that's used as an AES key to encrypt whatever data we sent when requesting the seed. The result of this is then used as a derived key in a second AES operation, which decrypts the randomly generated seed into the log-in key. See also the diagram below for a schematic representation.
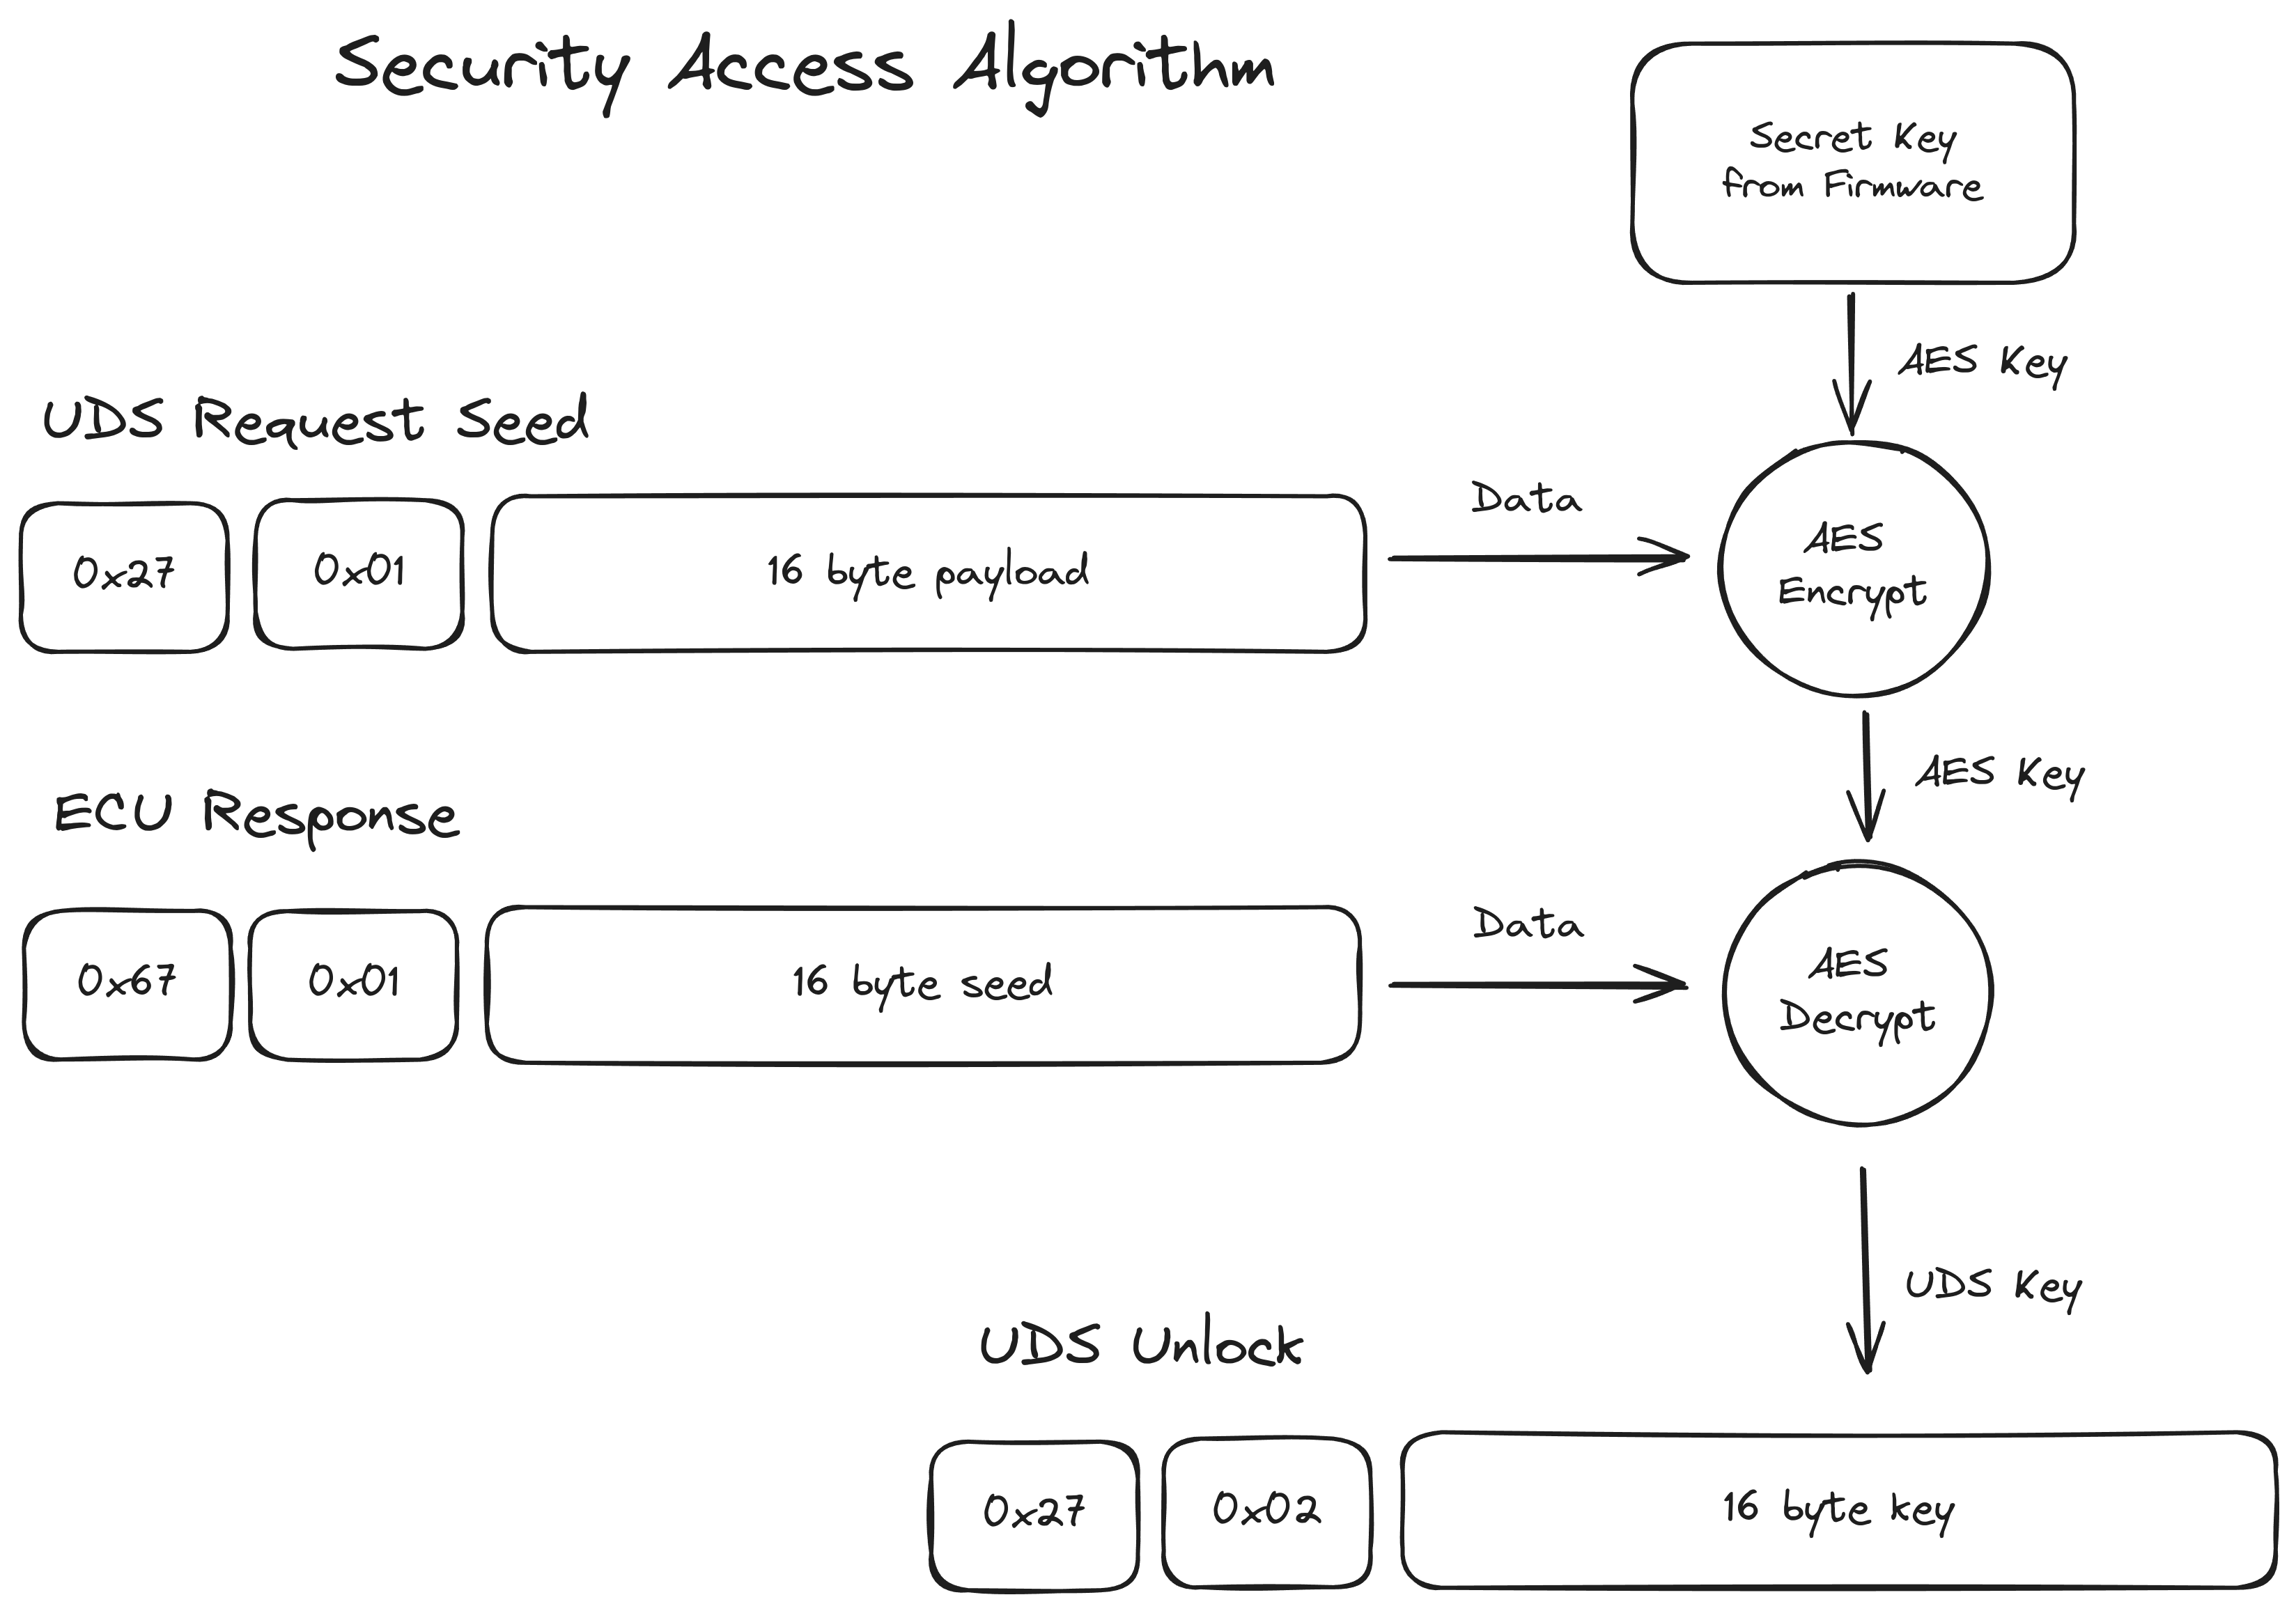 Seed/Key Algorithm
Payload Construction
Before we can construct the payload we need to send two values to the ECU that are used to derive some keys for decryption and CMAC computation. This is done using SID 0x2E (Write Data By Identifier). We need to write an AES Key (DID 0x201) and an AES IV (DID 0x202).
The payload that's uploaded to RAM needs to have a very specific format to pass all the checks done by the ECU. If these checks do not pass the code cannot be executed. The first part of the payload is straightforward and contains the code for the flashing routines or shellcode. At offset 0xFD0 a pointer is placed to the entrypoint of the main flashing function, in our case we point to the beginning of the payload. At offset 0xFE0 a few values related to a CRC32 check are placed, the start address and the size of the block that is checked. The address and size cannot be freely chosen, as they are compared to some expected values in the bootloader. The bootloader computes the CRC32 of the block, and expects this to be 0xFFFFFFFF. By placing a specially crafted padding value after the start and size we can ensure this is correct.
Besides the CRC32 check, there is also a CMAC check that needs to pass. First the key is derived in a similar fashion to the Security Access Algorithm. Another secret key from the firmware (not the same as the one for security access) is used to encrypt DID 0x201 to create a derived key. The CMAC is computed for the payload including the CRC values, prepended with the IV (DID 0x202), using this derived key. The CMAC is placed at the end of the payload. After the payload is assembled it also needs to be encrypted using AES CBC with the derived key and IV (DID 0x202). See the diagram below for a schematic representation of the payload layout and encryption steps.
A Python script to assemble the payload can be found in the repository, and includes a sample payload to extract the SecOC keys. Finding the secret to encrypt your own payloads is left as an exercise to the reader.
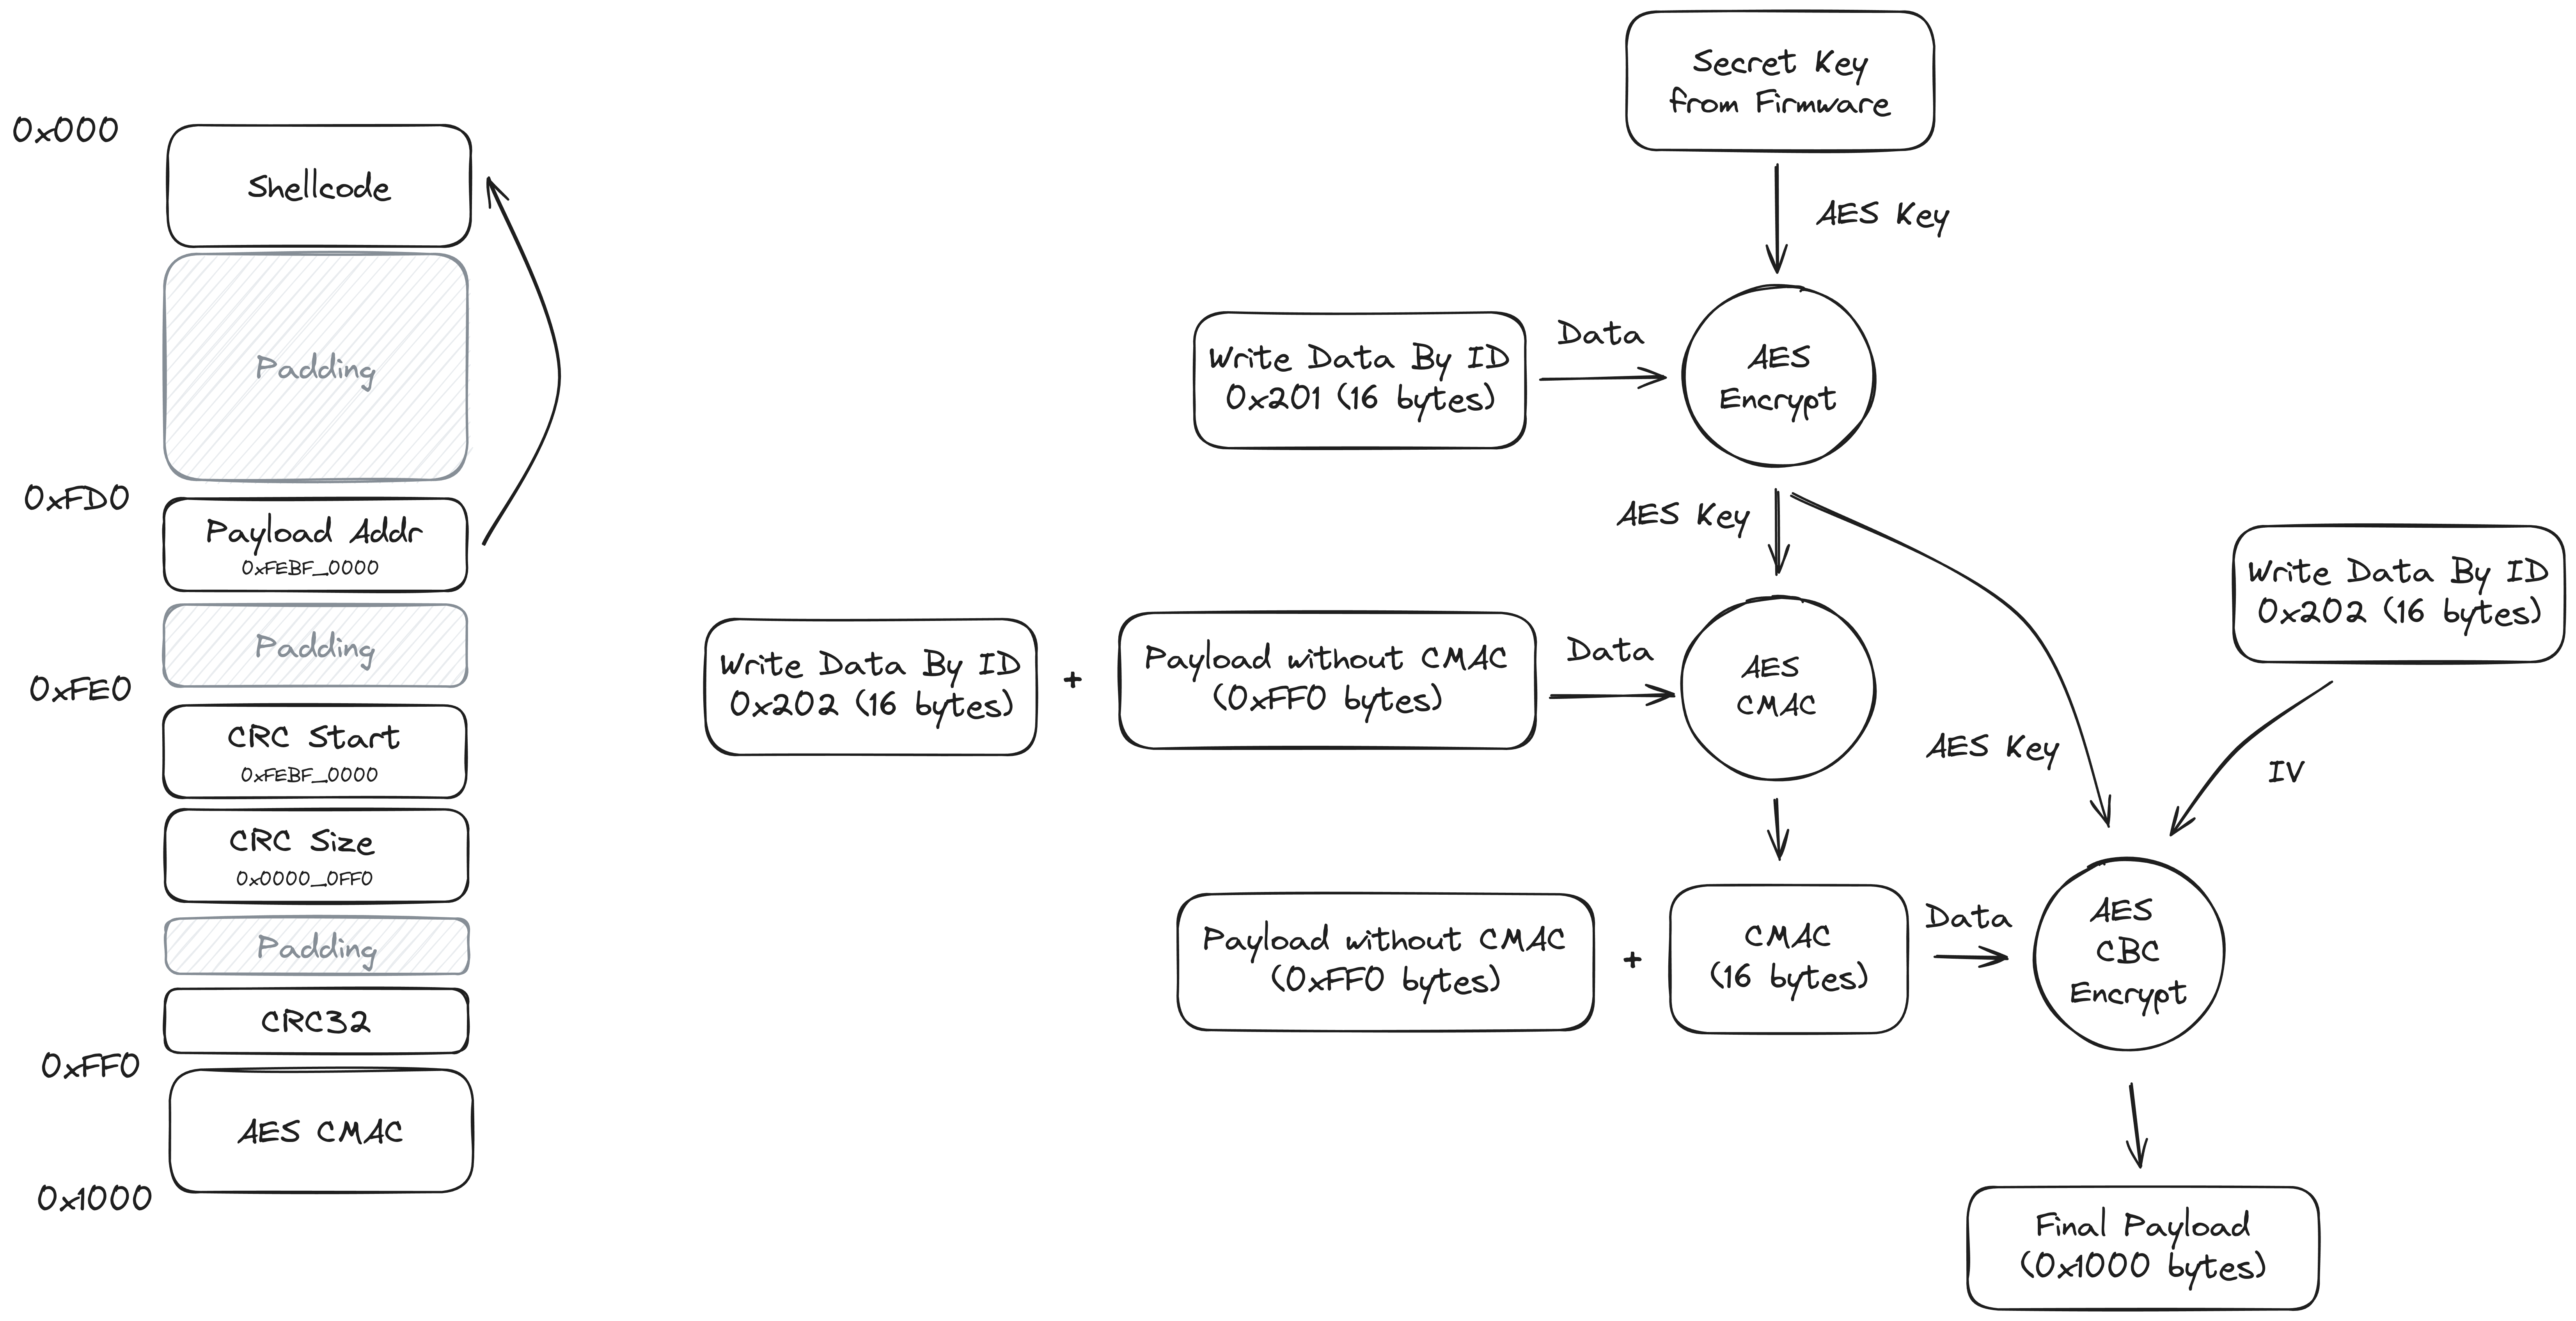 Payload Layout
Building Shellcode to Extract the Keys
As we identified in Application Reverse Engineering the keys are readable from data flash or from RAM (the bootloader does not clear RAM on startup), we just need to find a convenient way to extract them. We decided to write a small payload that allows dumping a memory region over then CAN bus, and then reboot the ECU when it's done.
To build the payload we wrote a Dockerfile that prepares a cross compiler, by building binutils and gcc for the v850-elf target. We only need to build the first stage of gcc, as we won't be using any of the standard libraries or headers.
We can then write a shellcode in C that writes the data in the appropriate registers to send it out over the CAN bus. The usage of the CAN peripheral can be read in the chip's User Manual, or by looking at the CAN bus code of the ECU's firmware in Ghidra. The payload is then compiled using v850-elf-gcc -ffreestanding, and converted into a raw binary using v850-elf-objcopy. After the payload is created we still need to go through the steps listed above to turn it into a payload that can be sent to the ECU.
Conclusion
In this blog post we discussed the different steps required to give the owner of the car full access to their CAN bus and generate valid SecOC MACs. Summarizing we took the following steps:
- Extracted the firmware from an ECU, using Fault Injection to bypass the locked debug port.
- Reverse engineered the application code, to understand how SecOC was implemented and find the location of the keys in RAM.
- Reverse engineered the bootloader, to understand how the update procedure works and how we can upload and run shellcode.
- We built a shellcode that extracts the keys from RAM and sends them out over CAN, then reboots the device.
This allows us to extract the SecOC key in just a few seconds, without making any changes to the vehicle. Having this key then allows us to send a message to any ECU we want, and control all drive-by-wire features such as Lane Keep Assist (LKA), Adaptive Cruise Control (ACC) or Automatic Emergency Braking (AEB).
This was possible due to two mistakes made my the developers of the ECU. The main problem is the lack of a proper cryptographic signature on the payload uploaded to the bootloader. This needs to be done using something like PKCS#1 RSA signatures, where extracting the firmware does not allow you to generate valid signatures. The second issue is not using an HSM to store the keys used in SecOC. However, it could be argued that without secure boot and code execution, it doesn't matter that much. More on this in the following section.
Notes on Newer Vehicles
This blog post only describes the process for the 2021 Rav4 Prime. When we started this research it was one of the few cars available with SecOC. It will be interesting to see if we can apply the same methods to the 2024 Prius, and 2024 Corolla, which also got SecOC and will be sold in much larger numbers.
We already took a quick look at the power steering from a 2023 Corolla Cross (also with SecOC) as it was easy to obtain and more recent than the Rav4 Prime. This ECU already showed some interesting developments. It's based on almost the same microcontroller and also shares the same bootloader code, so it was trivial to gain code execution again. This allowed extracting the firmware without needing fault injection again. However, they seemed to have realized that implementing SecOC in software might not have been the best move, and started using the HSM in the microcontroller.
From a theoretical perspective, SecOC can still be broken on these newer cars that use the HSM. We have code execution, so we can just ask the HSM to sign whatever message we want and turn the ECU into a signing oracle.
From a practical perspective however, we can't just extract the keys from RAM and use them in a third party device. However, we will have to do some more investigating on how the HSM is used exactly. Maybe the keys can still be extracted using a different method, for example during a rekeying operation. As a last resort we can always disable SecOC completely by patching the firmware, but this is not a very elegant solution.
Footnotes
- Remote Exploitation of an Unaltered Passenger Vehicle. Reverse engineering of the checksum algorithm is described on page 78. ↩
- The standard is also known as JasPar ST-CSP-6 Requirements Specification for Message Authentication. ↩
- Part number is
44250-42310. ↩ - ISO 14229-1, standard diagnostics protocol implemented on every modern ECU. ↩