Vehicle Cybersecurity Competition 2025 Writeup - PowerPC
Introduction
This is a writeup of the PowerPC automotive CTF challenge from the Vehicle Cybersecurity Competition 2025, which ran from August 22 to September 1, 2025, and was organized by Block Harbor and VicOne.
This challenge featured an emulated ECU connected to a Virtual Machine through a virtual SocketCAN bus (vcan0). On the VM, you could write your own code to interact with the ECU. The only information given was that the ECU used an MPC5566 PowerPC microcontroller; no firmware was provided.
The challenge consisted of two parts: the first was to unlock the ECU using UDS security access level 0x11, and the second was to reflash the ECU and obtain code execution. The vulnerabilities and algorithms were quite realistic and similar to what I have encountered in real-world ECUs.
Challenge #1 - Wired Keyless Entry
The goal of the first challenge is to bypass the level 0x11 of the "Security Access" service (0x27). This will likely involve dumping the ECU memory and reverse engineering the firmware to figure out the algorithm used for security access.
Finding the CAN Arbitration ID
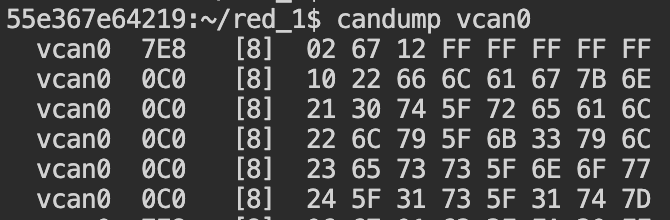
The first step was to figure out which CAN Arbitration IDs the ECU uses for communication. We can do this by sending a CAN frame to all IDs and seeing if we get a response. We can send a UDS Tester Present (3E 00, or 02 3E 00 AA AA AA AA AA encoded as proper ISO-TP), and wait for a positive response (7E 00). Alternatively, we can send an ISO-TP First Frame and check if we get a Flow Control frame back. The second method is more flexible, as it also works if the ECU uses a different protocol like KWP2000 instead of UDS. We can send this using a bash one-liner1, then check for responses using candump vcan0. We noticed a response on ID 0x7E8 when sending to 0x7E0, which are typical UDS addresses for an engine controller.
Enumerating the UDS Services and DIDs
Next, we explored the UDS server on the ECU to see what information it would provide. To make it more convenient to write Python scripts, I used socketpanda.py and uds.py. The first script I wrote was to enumerate the available UDS services. We can do this by sending an empty payload to each service ID. Based on the error we get back, we can determine if the service is supported. A "Service Not Supported" (0x11) error indicates the service is unavailable. However, an "Incorrect Message Length or Invalid Format" (0x13) error means the service is supported, and we just need to find the correct payload. We can write a small Python script to do this:
from socketpanda import SocketPanda
from uds import UdsClient

if __name__ == "__main__":
    p = SocketPanda('vcan0')
    uds = UdsClient(p, 0x7e0)

    for i in range(0, 0x100):
        try:
            uds._uds_request(i)
        except Exception as e:
            if not str(e).endswith("not supported"):
                print(hex(i), e)
This gives the following output:
0x10 DIAGNOSTIC_SESSION_CONTROL - incorrect message length or invalid format
0x11 ECU_RESET - incorrect message length or invalid format
0x22 READ_DATA_BY_IDENTIFIER - incorrect message length or invalid format
0x27 SECURITY_ACCESS - incorrect message length or invalid format
0x2c DYNAMICALLY_DEFINE_DATA_IDENTIFIER - service not supported in active session
0x3e TESTER_PRESENT - incorrect message length or invalid format
Only a few UDS services are available, but this is enough to get some information from the ECU. Since the Read Data by Identifier (0x22) service is available, we can try to read some common data identifiers. Using a small Python script, we can try to read all data identifiers from 0x0000 to 0xFFFF:
for did in range(0x0, 0x1_0000):
    try:
        resp = uds.read_data_by_identifier(did)
        print(hex(did), resp, resp.hex())
    except Exception as e:
        pass
This runs for a while and eventually yields a few positive responses:
0xf186 b'\x00' 00
0xf187 b'PN_B0NN3T\x00' 504e5f42304e4e335400
0xf18a b'AUDI' 41554449
0xf18b b'01292009' 3031323932303039
0xf18c b'AUDI2009' 4155444932303039
0xf190 b'1BHCM82633A004527' 314248434d383236333341303034353237
Although more steps are likely needed, we tried getting a seed for security level 0x11. We can do this using uds.security_access(0x11). This gives us the error "sub-function not supported in active session".
We can attempt to change the session using "Diagnostic Session Control" (0x10). The default session is 0x1, but we can try to switch to "Extended Diagnostic Session" (0x3) using uds.diagnostic_session_control(0x3). If we try that, we get an error indicating that we need to unlock the ECU first ("security access denied").
The "Dynamically Define Data Identifier" (0x2C) service is also interesting. It allows defining custom data identifiers pointing to an address in RAM or Flash, which can then be read back using "Read Data by Identifier" (0x22). We can use this to dump memory from the ECU. However, the error message indicates that this service is not supported in the current session.
At this point, we can re-evaluate the steps needed to solve the challenge. First, we likely need to unlock the ECU with a lower security level, such as 0x1, before switching to the extended diagnostic session. From the extended session, we can dump memory and look for the algorithm used for security access level 0x11.
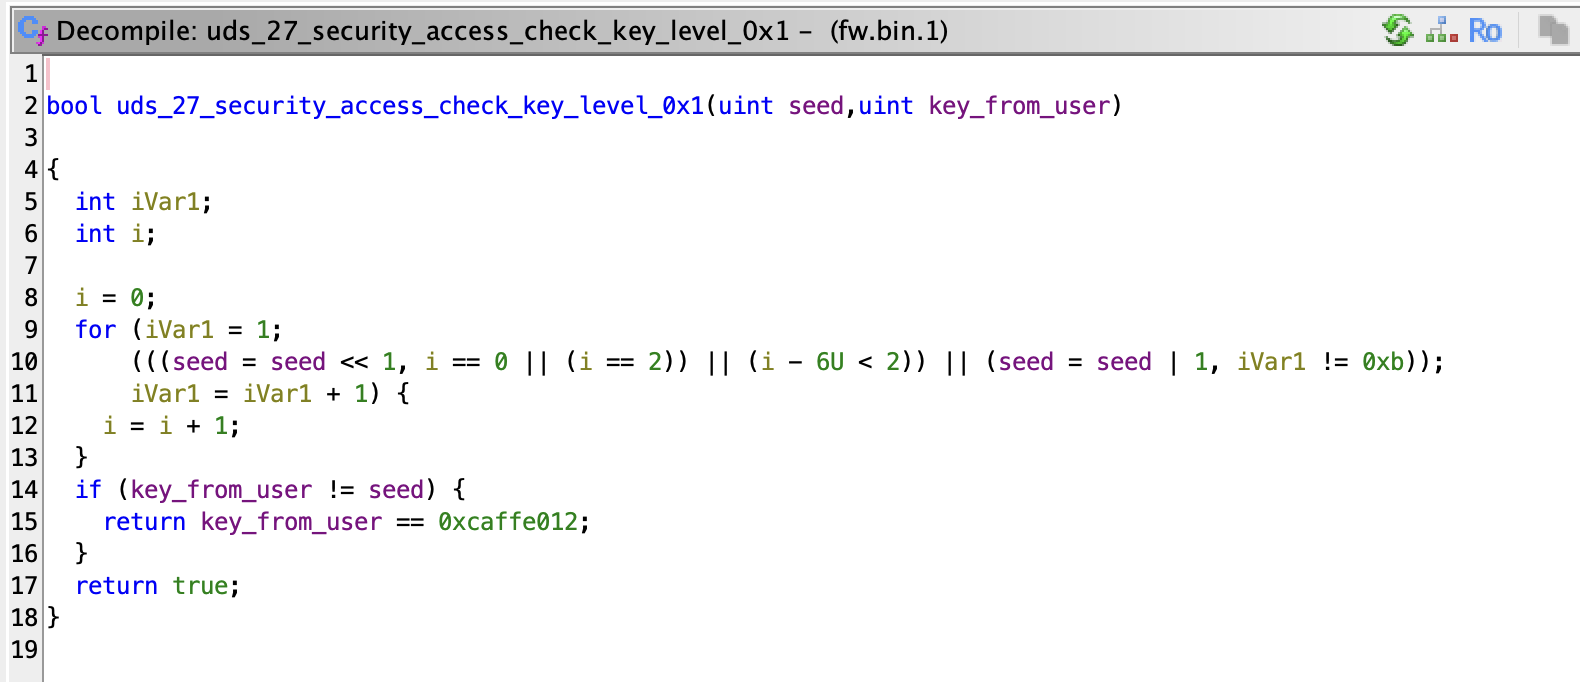
Security level 0x1
Let's first attempt to pass security access level 0x1. We can do this by requesting a seed using uds.security_access(0x1). This works and gives us a 4-byte seed. Using uds.security_access(0x2, key), we can send back a key calculated from the seed.
The next step is to figure out how to calculate the key based on the seed. Since we don't have the firmware yet, we can try some common algorithms such as adding a constant, which is very typical for VW Group cars (the DIDs mention Audi). I tried adding or XORing with various constants based on the DIDs, but none of them worked. I wasted quite a bit of time on this before realizing I needed to take a step back and think about what information was available.
I then decided to ask Gemini for help and gave it the DIDs I had read earlier. This turned out to be surprisingly helpful. It generated a report with a lot of nonsense, but it did include this gem pointing to the paper Beneath the Bonnet by Jan van den Herrewege and Flavio Garcia.
"DID 0xf187 (PN_B0NN3T): The OSINT Anchor - This identifier is the pivotal clue to the entire challenge. The string PN_B0NN3T is a leetspeak rendering of "Beneath the Bonnet." This is a direct and unambiguous reference to the seminal 2018 academic research paper, "Beneath the Bonnet: A Breakdown of Diagnostic Security"."
In section 3.4 of this paper, "Analysis of the Volkswagen Group cipher," it mentions the seed/key algorithm used by a 2009 Audi gateway module. They show both the full algorithm and a fixed backdoor key 0xCAFFE012. When we try this on the CTF ECU using uds.security_access(0x2, b"\xCA\xFF\xE0\x12"), we get a positive response! The ECU was now unlocked at security level 0x1, and we were able to enter the extended diagnostics session.
We dumped the firmware in a later step, but the relevant security access algorithm is shown here for context. It has a structure similar to the algorithm in the paper but lacks the XOR operation with 0x04C11DB7. The important part is that it contains the same backdoor constant.
Dumping the firmware
Now unlocked, we could enter the extended diagnostic session using uds.diagnostic_session_control(0x3). In this session, the "Dynamically Define Data Identifier" (0x2C) service became available. We can use this to dump memory from the ECU.
The following Python script dumps the readable flash memory from address 0x0 to 0x60000.
block_size = 128
did = 0xf300

with open('dump.bin', 'wb') as f:
    for addr in range(0x0000_0000, 0x0006_0000, block_size):
        definition = DynamicSourceDefinition(
            data_identifier=None,
            position=None,
            memory_size=block_size,
            memory_address=addr)

        uds.dynamically_define_data_identifier(0x2, did, [definition], memory_size_bytes=1)
        data = uds.read_data_by_identifier(did)

        f.write(data)
        f.flush()
Security level 0x11
Now that we can enter the Extended Diagnostics session, we can experiment a bit with the "Security Access" (0x27) service. We can request a seed for level 0x11 using uds.security_access(0x11), which gives us a 32-byte seed. It seems to expect a 128 byte key in response using uds.security_access(0x12, key).
After analyzing the dumped firmware and finding the relevant UDS handlers, I discovered a mysterious algorithm for verifying the security level 0x11 key. It expects a 128-byte user-provided payload (the key), which the algorithm processes. This algorithm outputs 128 bytes of processed data, of which the last 32 bytes are compared to a reordered version of the seed.
Not feeling like analyzing the complex-looking code involved by hand, I decided to ask Gemini for help again. I provided it with the decompiled code of the algorithm (and any helper functions involved) and asked it to explain how it works. The explanation was surprisingly good; it correctly identified that the code implements multiplication and modulo operations for large integers. After renaming some functions based on Gemini's suggestions, we ended up with the following code:
undefined8
mystery_function(byte *out_128_bytes,byte *data_from_user_128_bytes,byte *tmp_buf,
                byte *static_data_128_bytes)
{
  out_128_bytes[0] = 0;
  out_128_bytes[1] = 0;
  out_128_bytes[2] = 0;
  out_128_bytes[3] = 0;
  out_128_bytes[4] = 0;
  out_128_bytes[5] = 0;
  out_128_bytes[6] = 0;
  out_128_bytes[7] = 1;

  /* Clear rest of out_128_bytes, removed for brevity */

  int rounds = 0x10;
  modulo(tmp_buf,data_from_user_128_bytes,static_data_128_bytes,0x10);
  multiply_modulo(out_128_bytes,out_128_bytes,tmp_buf,static_data_128_bytes);
  do {
    rounds = rounds + -1;
    multiply_modulo(tmp_buf,tmp_buf,tmp_buf,static_data_128_bytes);
  } while (rounds != 0);
  multiply_modulo(out_128_bytes,out_128_bytes,tmp_buf,static_data_128_bytes);
  return 0;
}
The mystery_function can be summarized as the following mathematical operation: out_128_bytes = data_from_user ^ 65537 % static_data_128_bytes. This is an exact implementation of textbook RSA encryption, where data_from_user is the plaintext, out_128_bytes is the ciphertext, static_data_128_bytes is the modulus (n), and 65537 is the public exponent (e).
The solution is to provide the correct plaintext (the key) such that the last 32 bytes of the resulting ciphertext match the seed provided by the ECU. This is a textbook RSA signature verification operation, where the user needs to provide a valid signature for the given message (the seed).
However, how do we do this in practice? If the public exponent were e = 3, we could attempt to calculate the integer cubic root of the seed padded to 128 bytes (Bleichenbacher '06), but with e = 65537 this is not feasible. Either we need to find a flaw in the implementation, or we need to find the private key (p, q) corresponding to the public key (n, e).
After more firmware analysis, I figured out exactly how the modulus (n) is stored in memory. The bignum values are stored in an interesting middle-endian format, where each 8-byte chunk is little-endian, but the chunks themselves are stored in big-endian order. After obtaining the integer value of n, I was able to factor it using RsaCtfTool 2.
The final part of the challenge solution was to use the private key to sign the seed from the ECU, ensuring the resulting value after RSA "encryption" with the public key matched the exact format the ECU expected. During this process, I used the read memory primitive and the Ghidra emulator to check what the data looks like on the ECU side at different steps during the processing. The full solution can be found here. Running the RSA calculations on the ECU side takes about 5 minutes, after which it will send out the flag over CAN.
We have now completed the first part of the challenge, and managed to pass the Security Access checks for level 0x11. This will allows us to enter the Programming Session (jump to bootloader), which is needed for the second part of the challenge.
Challenge #2 - Tune-Up Trouble
The second part of the challenge requires us to reflash the ECU with a modified firmware image. The modified firmware must write to a special register, which proves code execution. This causes the ECU emulator to send the flag over CAN.
Bootloader reverse engineering
The ECU firmware dumped in part one consists of several parts. There is a bootloader at the start of the flash (0x10000) and then two copies of the main application stored at 0x40000 and 0x50000. Supposedly this supports some form of A/B updates, where the bootloader can choose which application to boot3.
The bootloader implements a fairly standard UDS update procedure. The only odd part is that it keeps the entire update file in RAM and only writes it to flash once the entire file has been received and verified. This would be impractical on a real ECU, as flash memory is usually much larger than the available RAM. Normally the new firmware would be directly written to flash, with a special marked written only after signature validation has been performed. The update procedure of this ECU consists of the following steps:
- Switch to programming session using
uds.diagnostic_session_control(0x2) - Request download using
uds.request_download(0x40000, 0x10000, 4, 4, 1) - Send data using
uds.transfer_data(block_number, data)until all data has been sent. When the final block has been sent, the ECU will automatically start the verification process. - Request transfer exit using
uds.request_transfer_exit(). I believe this step is actually optional on this ECU. - Call routine control 0x55aa using
uds.routine_control(0x1, 0x55aa). If the data has been successfully verified, the bootloader will write the new firmware to flash. - Reboot the ECU using ECU reset, or by requesting a Default Diagnostic session using
uds.diagnostic_session_control(0x1)
Firmware verification
The bootloader contains a verification step to ensure the firmware is valid before writing it to flash. After the final block is received, a SHA-256 hash is computed. The hash is compared to a signature provided by the user (the final 0x80 bytes of the firmware). The signature is verified by encrypting the final 0x80 bytes using RSA with a public key stored in the bootloader. If the verification fails, we cannot call routine 0x55aa to write the firmware to flash.
Unfortunately, the bootloader uses a different public modulus (n) than the one used for security access. This modulus is not easily factored, so we need to find another way to bypass the signature verification step.
Bypassing the verification
After reverse engineering the signature verification code, I found no obvious implementation flaws in the cryptography involved. Therefore, I started looking for other ways to bypass the verification step. While attempting to reproduce the signature verification in a Python script, I noticed the dumped ECU firmware still contained the correct signature at the end of the original firmware. This allows us to re-upload the original firmware and pass the signature verification.
Next, I examined how the ECU tracks the signature verification result. During the execution of the Transfer Data (0x36) handler of the final block, the signature is validated and the validation result is stored in a global variable in RAM. This variable is then checked again when calling routine 0x55aa. If the variable indicates the signature verification passed, the firmware is written to flash. However, I noticed two flaws that allow a bypass:
- The verification status variable is not cleared when a new update procedure starts.
- Routine control 0x55aa does not check if the firmware upload was fully completed. It only checks the verification result variable and then writes whatever is in the RAM buffer to flash.
This means we can first upload the original firmware (with the correct signature) to set the verification status variable. Then, if we start a new update procedure with our modified firmware, the variable will still indicate a pass. Consequently, we can call routine 0x55aa, and the bootloader will write our modified firmware to flash without verifying its signature. We just have to avoid fully completing the second upload, so the bootloader doesn't re-trigger the verification step.
To solve the challenge, we modified the original firmware's entrypoint to include shellcode that writes to the special register, causing the ECU to send the flag. We then upload the modified firmware using the above bypass technique making sure not to complete the upload of the second (modified) firmware. Finally, we called routine 0x55aa to write our modified firmware to flash and then rebooted the ECU. As the verification step takes a long time, the solution is split into two scripts. The first script uploads the original firmware, and the second script uploads the modified firmware and calls routine 0x55aa.

Conclusion
This was a fun challenge that required a mix of reverse engineering, cryptography, and exploitation skills. Similar to a real-world ECU engagement, very little information was provided upfront, requiring me to discover everything by myself by enumerating the ECU over UDS. The challenge was well-designed and appropriately difficult. The ECU firmware itself was also quite realistic. The bootloader vulnerability, in particular, is very similar to flaws I encountered in real-world ECUs.
Footnotes
for i in $(seq 0 2047); do cansend vcan0 $(printf "%03x" $i)#1008AAAAAAAAAAAA; done. ↩rsactftool -e 0x10001 -n 0xd546aa825cf61de97765f464fbfe4889ad8bf2f25a2175d02c8b6f2ac0c5c27b67035aec192b3741dd1f4d127531b07ab012eb86241c09c081499e69ef5aeac78dc6230d475da7ee17f02f63b6f09a2d381df9b6928e8d9e0747feba248bffdff89cdfaf4771658919b6981c9e1428e9a53425ca2a310aa6d760833118ee0d71 --private↩- This doesn't actually work as intended, as the boot header of the second application actually points its entrypoint back to the first copy of the application. However, this is not important for the challenge. ↩